สร้าง website รองรับหลายภาษา ด้วย i18n internationalization Java Spring Boot
รู้จักกับ internationalization และ i18n
ตอนใช้งาน framework ต่างๆ ที่รองรับการทำงาน internationalization ต้องเคยเจอกับคำว่า i18n กันมาบ้าง แต่เคยทราบไหมครับ ว่า i18n หมายถึงอะไร
จริงๆ แล้ว i18n เป็นตัวย่อจากคำว่า internationalization i คือตัวอักษรแรก 18 คือนวนตัวอักษรตรงกลาง และ n คือตัวอักษรสุดท้าย i + 18 ตัวอักษร + n = i18n
internationalization หรือ i18n เป็นการสร้าง website ให้รองรับการแสดงผลข้อความได้หลายภาษา ในรูปแบบที่แสดงภาษาอัตโนมัติตามที่ browser ถูกตั้งค่าไว้ หรือว่าจากการกำหนดค่าเองของ user
สำหรับการทำ internationalization ของ Spring Boot นั้น ในหน้า HTML page ที่ใช้ thymeleaf เป็น view engine เราจะใช้ syntax พิเศษที่แสดงค่าของข้อความตาม local ของ user
ตัวอย่างการใช้คำสั่งใน index.html
<label th:text="#{form.first-name}"></label>
ถ้า local ของ user คือ th view engine ก็จะไปเอาค่าของ key ที่ชื่อว่า hello จาก message_th.properties มาแสดง
form.first-name = ชื่อ
เข้าใจหลักการทำงานของ i18n Java Spring Boot
- user เปิดหน้า website ด้วย browser
- framework เรียกใช้ localeResolver เพื่อหาว่า local ปัจจุบันของ user คืออะไร ถ้าไม่มีก็ใช้ default local โดยค่า local นี้จะถูกอ่านมาจาก HTTP request accept-language หรือ web session หรือ cookie
- view engine จะใช้ค่า local เพื่อหา message file ที่เก็บ key และ value ของแต่ละ local เช่น ถ้า local ของ user คือ th ดังนั้น view engine ก็เรียกใช้ค่าที่อยู่ใน message file ที่มีชื่อว่า message_th.properties ตาม pattern message _local.properties
สิ่งที่ต้องให้ความสำคัญ ที่อาจจะทำให้ติดปัญหาได้
- file message_xx.properties มี encoding เป็น UTF8
- เราได้สร้าง default message file แล่วยัง เช่น ถ้า default local ของ user เป็น en ดังนั้น default message file ก็จะเป็น message_en.properties ไม่ใช่ message.properties
- ถ้า upgrade ไปใช้ lib version ใหม่ และมั่นใจว่าไม่ config อะไรผิด มีความเป็นไปได้ว่า lib มี bug ลองถอยกลับ version ก่อนหน้า
มาลองเขียน code กันเลยดีกว่า
เปิด intelliJ IDEA สร้าง Gradle Project กำหนดค่าต่างๆ ดีงต่อไปนี้
- GroupId com.codesanook.example
- ArtifactId spring-boot-i18n
แก้ไข build.gradle เพื่อใช้ library ที่จำเป็น หากไม่เข้าใจส่วนนี้สามารถอ่านจากบทความ Spring Boot basic ใน codesanook อ่าน basic Spring Boot
build.gradle
group 'com.codesanook.example'
version '1.0-SNAPSHOT'

buildscript {
    repositories {
        mavenCentral()
    }
    dependencies {
        classpath("org.springframework.boot:spring-boot-gradle-plugin:1.2.7.RELEASE")
    }
}
apply plugin: 'java'
apply plugin: 'spring-boot'
sourceCompatibility = 1.7
repositories {
    mavenCentral()
}

dependencies {
    compile("org.springframework.boot:spring-boot-starter-web:1.2.7.RELEASE")
    compile("org.springframework.boot:spring-boot-starter-thymeleaf:1.2.7.RELEASE")
    compile('net.sourceforge.nekohtml:nekohtml:1.9.22')
}
กำหนด config ใน application.properties
spring.thymeleaf.mode=LEGACYHTML5
spring.thymeleaf.cache=false

# INTERNATIONALIZATION (MessageSourceAutoConfiguration)
spring.messages.basename=i18n/messages
spring.messages.cache-seconds=0
spring.messages.encoding=UTF-8
สร้าง messages_th.properties เพื่อรองรับภาษาไทย และ messages_en.properties เพื่อภาษาอังกฤษ
src\main\resources\i18n\messages_th.properties
form.first-name = ชื่อ
form.last-name = นามสกุล
src\main\resources\i18n\message_en.properties
form.first-name = first name
form.last-name = last name
สร้าง html file มี form ให้กรอกข้อมูลชื่อและนามสกุล โดยที่ label แสดงค่าที่เปลี่ยนตาม local ของ user
src\main\resources\templates\index.html
<!DOCTYPE html>
<html lang="en">
<head>
<meta charset="UTF-8">
<title>index</title>
</head>
<body>
<form>
<div>
<label th:text="#{form.first-name}"></label>
<br/>
<input type="text" name="firstName">
</div>
<div>
<label th:text="#{form.last-name}"></label>
<br/>
<input type="text" name="lastName">
</div>
<div>
<input type="submit" value="submit"/>
</div>
</form>
</body>
</html>
```
สร้าง Application.java เพื่อเป็น entry point ของ application
**src\main\java\com\codesanook\example\Application.java**
```
package com.codesanook.example;
import org.springframework.boot.SpringApplication;
import org.springframework.boot.autoconfigure.SpringBootApplication;
@SpringBootApplication
public class Application {
public static void main(String[] args) {
SpringApplication.run(Application.class, args);
}
}
```
สร้าง HomeController.java เพื่อเป็น controller ของ class จัดการ mapping HTTP request ที่เข้ามาและ return HTML
**src\main\java\com\codesanook\example\HomeController.java**
```
package com.codesanook.example;
import org.springframework.stereotype.Controller;
import org.springframework.web.bind.annotation.RequestMapping;
@Controller
public class HomeController {
@RequestMapping("/")
String home() {
return "index";
}
}
```
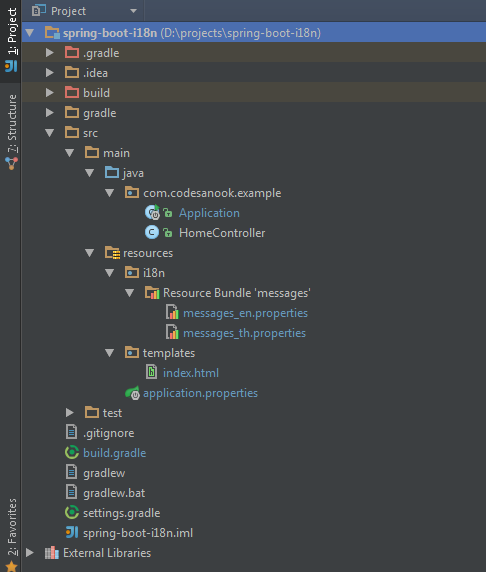
### โครงสร้างของ project
### ทดสอบการใช้งาน
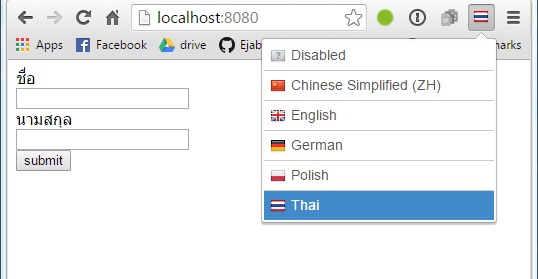
ผมใช้ Chrome เป็น browser ในการทดสอบ และเพื่อความสะดวกในการปรับเปลี่ยน HTTP Accept-Language แนะนำให้ลง plug in ที่ชื่อว่า **Quick language switcher**
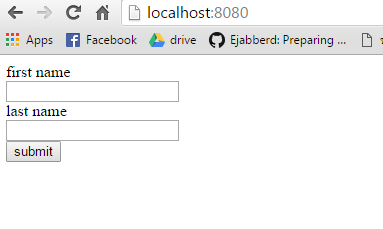
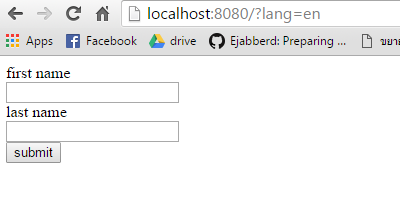
**http://localhost:8080**
ลองเปลียนเป็นภาษาไทยบ้าง
### เพิ่มความสามารถให้ user เปลี่ยนภาษาได้เอง
เนื่องจาก Spring Boot เน้นการใช่งานที่ง่าย มี auto config ต่างๆ พร้อมใช้งานได้ทันที เพียงแค่ปรับค่านิดหน่อยก็ใช้งาน feature internationalization ได้ทันที ดังที่เราได้เห็นจากตัวอย่างที่ผ่านมา
แต่ถ้าเราต้องการให้ user สามารถเปลี่ยนภาษาได้เอง เช่นทำปุ่มให้เปลี่ยนภาษา และเมื่อ user ปิด browser ไป แล้วกลับมาเปิดหน้า web ใหม่ หน้า web ก็แสดงภาษาถูกต้องตามที่ user เคยกำหนดไว้
ตรงส่วนนี้เราต้องทำการ สร่าง bean object และกำหนดค่า interceptor ครับ
โดยเราจะสร้าง file ชื่อว่า WebConfig.java เพื่อเก็บค่า local ที่ user กำหนดไว้ใน cookie
**src\main\java\com\codesanook\example\WebConfig.java**
```
package com.codesanook.example;
import org.springframework.context.annotation.Bean;
import org.springframework.context.annotation.Configuration;
import org.springframework.web.servlet.LocaleResolver;
import org.springframework.web.servlet.config.annotation.InterceptorRegistry;
import org.springframework.web.servlet.config.annotation.WebMvcConfigurerAdapter;
import org.springframework.web.servlet.i18n.CookieLocaleResolver;
import org.springframework.web.servlet.i18n.LocaleChangeInterceptor;
import java.util.Locale;
@Configuration
public class WebConfig extends WebMvcConfigurerAdapter {
@Bean
public LocaleResolver localeResolver() {
CookieLocaleResolver resolver = new CookieLocaleResolver();
resolver.setDefaultLocale(new Locale("th"));
resolver.setCookiePath("/");
resolver.setCookieName("cs-user-local");
int ageInSeconds = 30 * 24 * 60 * 60;
resolver.setCookieMaxAge(ageInSeconds);
return resolver;
}
@Override
public void addInterceptors(InterceptorRegistry registry) {
LocaleChangeInterceptor lci = new LocaleChangeInterceptor();
lci.setParamName("lang");
registry.addInterceptor(lci);
}
}
```
### ทดสอบการใช้งาน
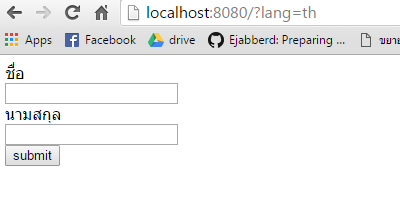
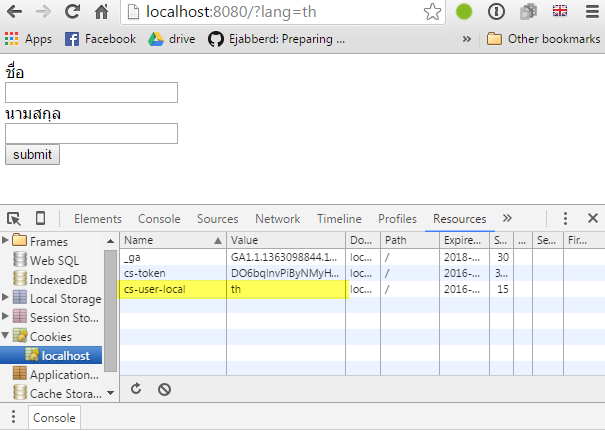
ใช้ browser เปิด URL http://localhost:8080 และเพิ่ม query string ?lang=en เพื่อกำหนดเป็นภาษาไทย และ ?lang=th กำหนดเป็นภาษาอังกฤษ
**http://localhost:8080?lang=th**
**http://localhost:8080?lang=en**
ทดลองเปิด browser แล้วเปิดใหม่ web ก็จะแสดงภาษาเดิมที่ได้กำหนดไว้ และเมื่อดู cookie ก็จะมีค่า local เก็บไว้ด้วย
### ส่งท้าย
หวังว่าผู้อ่านจะเข้าใจและเห็นภาพการใช้งาน i18n ใน Spring Boot กันแล้วนะครับ ทำได้ไม่ยากเลย เมื่อวางโครงสร้างไว้แล้ว ต่่อไปจะเพิ่มให้รองรับภาษาอื่นๆ ก็ทำได้ไม่ยาก
ถ้าใครมีคำถาม ข้อสังสัยใด comment กันมากได้นะครับ
**ขอให้ทุกคนสนุกกับการเขียนโคดครับ**
### [download source code](https://github.com/codesanook/spring-boot-i18n)