เริ่มต้น Spring Boot part 6 ใช้งาน entity class และ REST API อย่างง่าย
จากบทความที่ผ่านมา เราได้เตรียม entity class ไว้แล้ว ต่อไปเราจะนำ entity class นี้ไปใช้งานกัน
โดยสิ่งที่เราจะเรียนรู้ มีดังต่อไปนี้
- สร้าง repository class เพื่อจัดการกับ entity class
- เรียกใช้ entity class ใน controller REST API ผ่าน repository class
สร้าง repository class เพื่อจัดการกับ entity class
Repository class เป็น class ที่ช่วยในการจัดการกับ entity ของเรา โดยปกติ JPA จะมี entityManager มาให้เราจัดการกับ entity โดยตรง แต่การใช้จัดการกับ entity class ไม่ว่าจะเป็น get, add, update, delete ช่วยให้ program ของเรามีความยืดหยุ่นในการแก้ไข
กล่าวคือ ถ้าเราจำเป็นต้องเปลี่ยนส่วนของการเก็บข้อมูล แล้วเราสร้าง repository class เป็น interface ไว้ เราสามารถสร้าง implementation หลายแบบ เช่น implementation ของ NoSQL, ของ relational database, ของ Unit test เราก็สามารถที่จะสลับเปลี่ยนแปลงได้ทันที เพิ่มความสะดวก ยึดหยุ่นในการใช้งาน
ให้เราสร้าง repository class ชื่อว่า PatientRepository.java ใน package com.codesanook.springclinic.repository แก้ไข file เป็นดังนี้
src\main\java\com\codesanook\springclinic\repository\PatientRepository.java
package com.codesanook.springclinic.repository;

import com.codesanook.springclinic.model.Patient;
import org.springframework.stereotype.Repository;
import javax.persistence.EntityManager;
import javax.persistence.PersistenceContext;
import javax.persistence.Query;
import java.util.List;

@Repository
public class PatientRepository {

    @PersistenceContext
    EntityManager entityManager;

    public Patient get(int hospitalNumber) {
        Patient patient = entityManager.getReference(Patient.class, hospitalNumber);
        return patient;
    }


    public List<Patient> getAll() {
        Query query = entityManager.createQuery("select p from Patient p",
                Patient.class);
        return query.getResultList();
    }


    public void add(Patient patient) {
        entityManager.persist(patient);
    }


    public void remove(Patient patient) {
        entityManager.remove(patient);
    }

}
อธิบายคำสั่งใน PatientRepository
- @Repository เป็น annotation พิเศษที่บอกว่า class นี้เป็น repository class จริงๆ แล้วก็คือการแสดงว่า class นี้เป็น spring bean และจะถูกสร้างอัตโนมัติโดย Spring framework แต่มีชื่อว่า @Repository ออกมาเพื่อให้เป็นการระบุชนิดของ class บ่งบอกถึงวัตถุประสงค์ของ class ได้ชัดเจน
- EntityManager entityManager; entityManager เป็น class ที่มาจาก JPA Hibernate ใช้สำหรับจัดการกับ entity class ไม่ว่าจะเป็นการ get, get all, add, remove หรือ query data
- @PersistenceContext เป็นการให้ framework assign entityManager object ให้อัติโนมัติ
เรียกใช้ entity class ใน controller REST API ผ่าน repository class
ต่อไปเราจะสร้าง controller class ขึ้นมาใหม่ชื่อว่า PatientController โดยจะใช้ class นี่เป็นตัวจัดการ REST API request response โดยรับ request และส่ง request ในรูปแบบ JSON
สร้าง class PatientController ใน package package com.codesanook.springclinic.apicontroller แล้วแก้ไขข้อมูลเป็นดังนี้
package com.codesanook.springclinic.apicontroller;

import com.codesanook.springclinic.model.Patient;
import com.codesanook.springclinic.repository.PatientRepository;
import org.springframework.beans.factory.annotation.Autowired;
import org.springframework.transaction.annotation.Isolation;
import org.springframework.transaction.annotation.Transactional;
import org.springframework.web.bind.annotation.*;
import java.util.List;


@RestController
@RequestMapping("/api/patients")
@Transactional(readOnly = false, rollbackFor = Exception.class,
        isolation = Isolation.READ_COMMITTED)
public class PatientController {

    private PatientRepository patientRepository;

    @Autowired
    public PatientController(PatientRepository patientRepository) {
        this.patientRepository = patientRepository;
    }


    @RequestMapping(value = "", method = RequestMethod.POST)
    public int addPatient(@RequestBody Patient patient) {
        patientRepository.add(patient);
        return patient.getHospitalNumber();
    }


    @RequestMapping(value = "", method = RequestMethod.GET)
    public List<Patient> getAllPatients() {
        return patientRepository.getAll();
    }


    @RequestMapping(value = "/{hospitalNumber}", method = RequestMethod.GET)
    public Patient getPatient(@PathVariable int hospitalNumber) {
        return patientRepository.get(hospitalNumber);
    }


    @RequestMapping(value = "/{hospitalNumber}", method = RequestMethod.PUT)
    public void updatePatient(@PathVariable int hospitalNumber,
                              @RequestBody Patient patientRequest) {
        Patient patient = patientRepository.get(hospitalNumber);
        patient.setFirstName(patientRequest.getFirstName());
        patient.setLastName(patientRequest.getLastName());
    }


    @RequestMapping(value = "/{hospitalNumber}", method = RequestMethod.DELETE)
    public void removePatient(@PathVariable int hospitalNumber) {
        Patient patient = patientRepository.get(hospitalNumber);
        patientRepository.remove(patient);
    }
}
- @RestController เป็นการทำให้ class นี้เป็น Controller class ที่สร้างขึ้นเพื่อรองรับ REST API โดยเฉพาะ ค่าที่ return ออกไปจาก method ใน class จะถูกแปลงเป็น JSON โดยอัตโนมัติ หากใช้ @Controller เราต้องระบุ @@ResponseBody ในทุก method
- เราเรียกใช้งาน patientRepository ภายใน class นี้ และ patientRepository ถูก assign ค่า หรือ inject ผ่าน constructor ของ class @Autowired
method ต่างๆ ของ class ถูก map เข้า URL ต่างๆ ดังนี้
- POST /api/patients เพิ่มข้อมูลผู้ป่วยเข้าฐานข้อมูล
- GET /api/patients ดึงข้อมูลผู้ป่วยทั้งหมดออกมาจากฐานข้อมูล
- GET /api/patients/{hospitalNumber} ดึงข้อมูลเฉพาะผู้ป่วยที่มี hospitalNumber ตรงกัน
- PUT /api/patients/{hospitalNumber} แก้ไขข้อมูลผู้ป่วยที่มี hospitalNumber ตรงกัน
- DELETE /api/patients/{hospitalNumber} ลบข้อมูลผู้ป่วยที่มี hospitalNumber ตรงกัน
** เนื่องจากเรามีการสร้าง @Repository และ @RestController class จึงจำเป็นที่ต้อง config ค่าเพิ่มเติม เพื่อทำให้ Spring Framework สร้าง class นี้ให้เราโดยอัตโนมัติ **
แก้ไข HomeController.Java โดยเพิ่มคำสั่ง @SpringBootApplication เข้าไป
package com.codesanook.springclinic;

import org.springframework.boot.SpringApplication;
import org.springframework.boot.autoconfigure.EnableAutoConfiguration;
import org.springframework.boot.autoconfigure.SpringBootApplication;
import org.springframework.stereotype.Controller;
import org.springframework.web.bind.annotation.RequestMapping;

@Controller
@EnableAutoConfiguration
@SpringBootApplication
public class HomeController {

    @RequestMapping("/")
    String home() {
        return "index";
    }


    public static void main(String[] args) throws Exception {
        SpringApplication.run(HomeController.class, args);
    }

}
ทดสอบการใช้งานของ program
ไปที่ Gradle window และใช้คำสั่ง bootRun
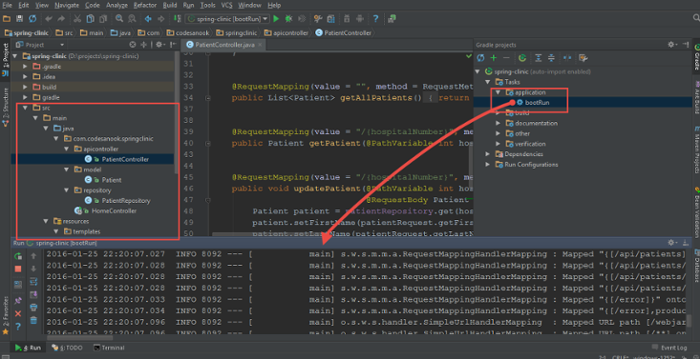
สามารถใช้ plugin poster ของ firefox CURL หรือ tool อื่นๆ ในการทดสอบ request REST API
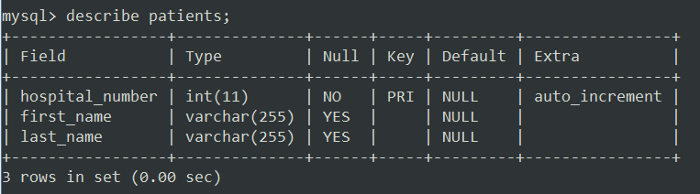
เมื่อ web run ขึ้นมาครั้งแรก Hibernate จะสร้าง table Patient ให้โดยอัติโนมัติ
** โครงสร้างของ table ที่ถูกสร้างขึ้นมา **
ทดสอบ post API ผ่าน FireFox ด้วย plugin Poster
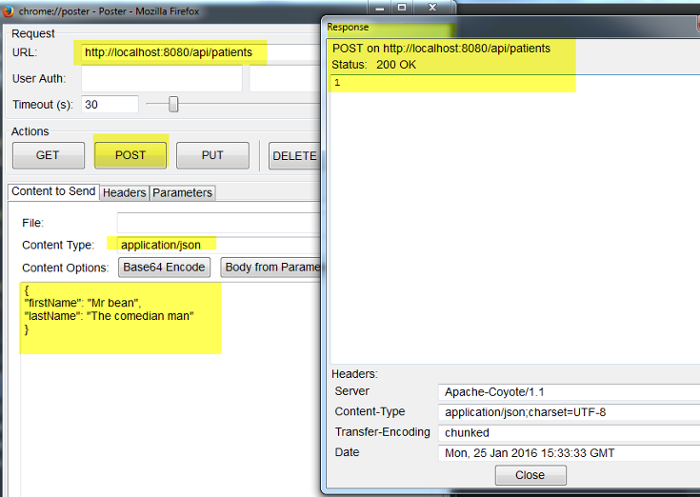
เมื่อลอง query ดูข้อมูลใน database ก็จะมีข้อมูลผู้ป่วยแสดงขึ้นมา 1 row
mysql> select * from patients;
+-----------------+------------+------------------+
| hospital_number | first_name | last_name        |
+-----------------+------------+------------------+
|               1 | Mr bean    | The comedian man |
+-----------------+------------+------------------+
1 row in set (0.00 sec)
เพื่อความสั้นกระชับของเนื้อหา แต่อย่างไรก็ตาม ผู้อ่านสามารถทดสอบ API อื่นๆได้เลยนะครับ
จบเนื้อหาในตอนนี้ มีความเห็นใดๆ comment กันมาได้เลยนะครับ
ขอบคุณครับ
CREDIT
Using MySQL in Spring Boot via Spring Data JPA and Hibernate